6. Setup Steps, Illustrated
Optional recipes that connect CGS to your own assets — audio mixer, input actions, IL2CPP link.xml, and Addressables.
Nothing in this chapter is required to start using the framework — everything works out of the box. These steps connect the framework to your assets: your audio mixer, your input bindings, your build settings, and (optionally) Addressables. Each step is a complete recipe you can follow top to bottom.
6.1 Use your own audio mixer
The audio service ships with a bundled mixer, so sound works immediately. When you are ready to use your own Unity AudioMixer asset, it needs two things:
- Three groups under Master, named exactly
Music,Sfx, andVoice. The audio service routes each channel to the group with the matching name. - Four exposed float parameters for volume, named
MasterVolume,MusicVolume,SfxVolume, andVoiceVolume. To expose a parameter, select a group, right-click its Volume field in the Inspector, and choose "Expose ... to script". Rename it in the mixer's Exposed Parameters dropdown.
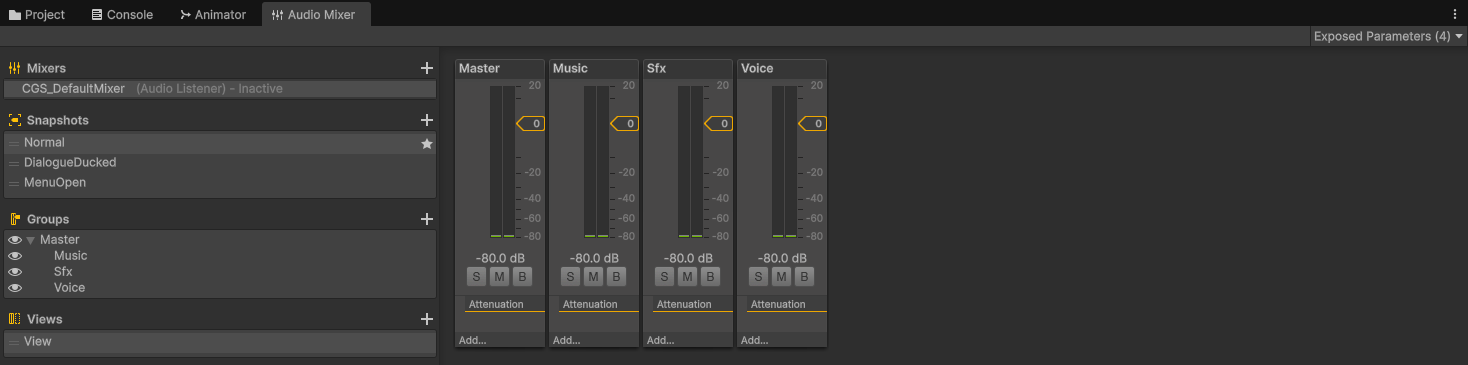
The Audio Mixer window with the three required groups (Music, Sfx, Voice) under Master. The Exposed Parameters dropdown (top right) must list the four volume parameters: MasterVolume, MusicVolume, SfxVolume, VoiceVolume.
Then hand your mixer to the framework with a small script in your first scene. It builds a fresh audio service around your mixer and swaps it in:
using CommonGameSystem.Core;
using UnityEngine;
using UnityEngine.Audio;

[DefaultExecutionOrder(-100)] // swap before other scripts cache the audio service
public sealed class AudioSetup : MonoBehaviour
{
    [SerializeField] private AudioMixer gameMixer; // assign your mixer in the Inspector

    private void Awake()
    {
        var options = AudioOptions.Default;
        options.Mixer = gameMixer;
        // Used different parameter names? Point the service at them:
        // options.masterParam = "MyMasterVol";

        var previous = ServiceLocator.Resolve<IAudioService>() as System.IDisposable;
        ServiceLocator.Replace<IAudioService>(new AudioService(
            ServiceLocator.Resolve<IConfiguration>(),
            ServiceLocator.Resolve<IEventBus>(),
            ServiceLocator.Resolve<IObjectPoolService>(),
            ServiceLocator.Resolve<ITimeService>(),
            options));
        previous?.Dispose(); // removes the old service's hidden helper object
    }
}
Volume sliders in your options menu talk to the settings service, not to the mixer directly. Read the current group with Get<AudioSettings>(), change a field, then call Set(...) followed by FlushPending<AudioSettings>(). The flush saves the change and pushes the new volume to the mixer immediately. Full reference: Audio and Configuration.
6.2 Hook up your own input actions
The input service reads a Unity Input System asset (an .inputactions file) that you create — the framework ships only an empty placeholder. Your asset defines the action maps ("Gameplay", "Menu") and the bindings inside them.
- Create the asset: right-click in your Project window, then Create > Input Actions. Name it something like
GameInput. - Open it and add your action maps and actions — for example, a "Gameplay" map with "Move" and "Jump".
- If you use the framework's UI panel stack with its automatic input switching, also add two maps named exactly
ui.panelandui.modal. The panel stack enables them while menus are open. The names are case-sensitive.
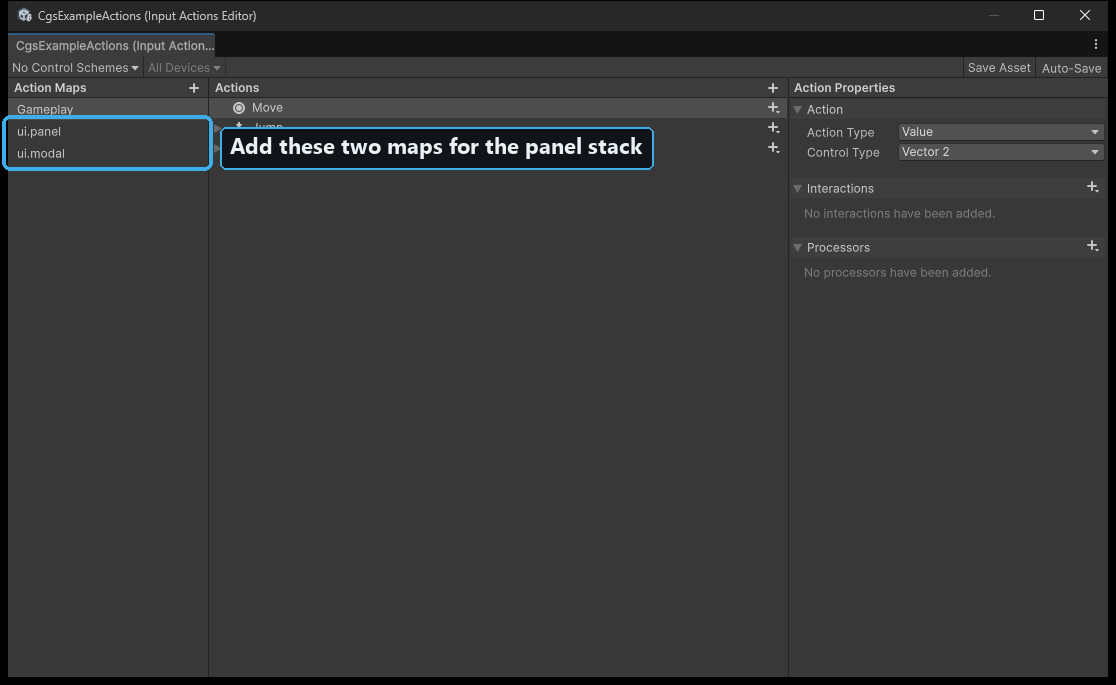
The Input Actions editor showing an asset with a "Gameplay" map plus the two panel-stack maps, ui.panel and ui.modal (highlighted) — the end state to aim for. The framework never edits this asset — deadzones, holds, and bindings stay fully under your control.
Wire the asset in with one script in your first scene. It rebuilds the input service around your asset, and rebuilds the panel stack so menu navigation uses it too:
using CommonGameSystem.Core;
using UnityEngine;
using UnityEngine.InputSystem;

[DefaultExecutionOrder(-100)] // swap before other scripts cache these services
public sealed class InputSetup : MonoBehaviour
{
    [SerializeField] private InputActionAsset actions; // your .inputactions asset

    private void Awake()
    {
        var source = new HardcodedInputKeyMapSource(actions);
        var bus  = ServiceLocator.Resolve<IEventBus>();
        var time = ServiceLocator.Resolve<ITimeService>();

        var oldInput = ServiceLocator.Resolve<IInputService>() as System.IDisposable;
        var oldUi    = ServiceLocator.Resolve<IPanelStack>()  as System.IDisposable;

        ServiceLocator.Replace<IInputKeyMapSource>(source);
        var input = new DefaultInputService(source, bus);
        ServiceLocator.Replace<IInputService>(input);
        ServiceLocator.Replace<IPanelStack>(
            new PanelStack(bus, input, time, PanelStackOptions.Default));

        oldInput?.Dispose();
        oldUi?.Dispose();
    }
}
If you do not use the panel stack, delete the two IPanelStack lines and the oldUi lines. If your scripts live in their own assembly definition, this script needs references to CommonGameSystem.Input, CommonGameSystem.UI, and Unity.InputSystem — see the table in chapter 7.1.
Rebinding that survives restarts. When a player remaps a control (the service's interactive rebind walks them through pressing the new key), call SaveBindingOverrides() afterward. The overrides are stored in Unity's PlayerPrefs. Call LoadBindingOverrides() once at start-up to restore them, and ResetBindingOverrides() for a "restore defaults" button. Full reference: Input.
6.3 IL2CPP builds: keep your save classes alive (link.xml)
IL2CPP builds strip code that looks unused, to shrink your game. Classes that are only created through serialization — your save data, your custom settings groups, event classes you serialize — can look unused to the stripper. The result: saving works in the editor, then quietly breaks in the built game.
The fix is a link.xml file, which tells Unity "never strip these". Create a file named exactly link.xml anywhere under Assets/ (the folder root is fine) with your own classes listed:
<linker>
  <assembly fullname="Assembly-CSharp">
    <type fullname="MyGame.PlayerSave" preserve="all"/>
    <type fullname="MyGame.OptionsSave" preserve="all"/>
  </assembly>
</linker>
Where does this file go? Save it as
Assets/link.xml. Each<type>line names one of YOUR classes with its full namespace. "Assembly-CSharp" is the default assembly for project scripts — if your code uses assembly definitions, use that assembly's name instead.
Rules of thumb:
- Add one
<type>line per class you pass toSave<T>(...)or store as a settings group. fullnameis the class name including its namespace. A typo here fails silently, so copy it from your code.- The framework's own types are already protected. You only list your classes.
- This affects IL2CPP builds only. The editor and Mono builds never strip, which is why the bug hides until a real build.
6.4 Addressables setup (only if you load assets by address)
Two services need Unity's Addressables package: the asset provider (load prefabs, sprites, and audio by a text address, with automatic reference counting) and the addressable scene service (additive scenes from Addressables). If you do not use either, skip this section — the framework runs fine without the package.
- Install Addressables (
com.unity.addressables) from Window > Package Manager, Unity Registry tab. - Open Window > Asset Management > Addressables > Groups and click Create Addressables Settings once.
- Select an asset you want to load at runtime and tick Addressable at the top of its Inspector. The text field next to the checkbox is its address.
- That address string is the key you pass to the framework:
await assets.LoadAsync<GameObject>("characters/player").
In the editor, Play mode loads addressable assets directly from the project, so you can iterate freely. Before shipping a player build, build the Addressables content once from the Groups window (Build > New Build > Default Build Script). When the package is installed, both services register automatically at start-up — there is no extra framework setup.