Quick start
Enable the plugin, add the two components, bind one event and play with two players.
Before you start — Unreal Engine 5.6, 5.7 or 5.8; any of the three. The plugin is installed but not yet enabled — step 1 enables it. A fresh Third Person template project, opened once so its shaders are built.
Seven steps, a few minutes, and at the end two clients react to the same press. The timing is a design budget, not a measurement — no one has yet been timed running these steps, so the first recorded walkthrough replaces this sentence with the figure it measures. The kit is supported on 5.6–5.8; its multiplayer end-to-end suite is run on all three.
1. Enable
Open Edit → Plugins, search for APIAPI's Interaction Kit and tick Enabled, then restart
when the editor asks. The kit ships with EnabledByDefault: false, so every project turns it on
once, whichever way it was installed. Install it in the engine or the project, never both —
install.md says why.
Verify — You should now see the editor back, with APIAPI's Interaction Kit listed as Enabled in Edit → Plugins and no missing-modules message.
2. Pawn
Open the project's third-person character Blueprint. Click Add, type UK Interactor, add it,
then Compile and Save. That is the only component to add: the key binding comes from the
kit's own local-player subsystem. If the Output Log warns UK-VAL-034, your project replaces
Default Input Component Class — input.md.
Verify — You should now see the UK Interactor component in the Components panel, the Compile button green, and no yellow warning in the Output Log.
3. Interactable
Content Browser: right-click → Blueprint Class → Actor, named BP_Crate. Add a
Cube, then Add UK Interactable; set its Preset to DA_Instant. In Class
Defaults tick Replicates — without it a networked game reads InvalidSetup and shows no prompt.
Compile, then drag it into the level.
Start from the class: an actor already placed leaves no Blueprint for step 4.
Verify — You should now see Preset reading DA_Instant on the UK Interactable component and Replicates ticked in Class Defaults.
4. Bind
In BP_Crate, select the component from step 3. Under Details → Events, click the green
+ beside On Behavior Value Changed. Drag its New pin into a Print String node's
In String pin (the editor adds the conversion) and set Duration to 10. Compile.
On Behavior Value Changed fires on every machine — bind it for anything the world shows or
does (meshes, lights, sounds, labels); every player sees the same result, including you.
On Interaction Completed fires on the authority only — bind it for the once-per-interaction
game logic that must never run twice (give the item, open the gate, add the score). If you change
a mesh from On Interaction Completed, the other players see nothing.
Which machine? On Behavior Value Changed — Every machine.
Verify — You should now see the event node wired to Print String and the Compile button green.
5. PIE
Open the Play dropdown (beside Play). Set Number of Players to 2 and Net Mode
to Play As Client; that alone launches a dedicated server, and there is no separate checkbox.
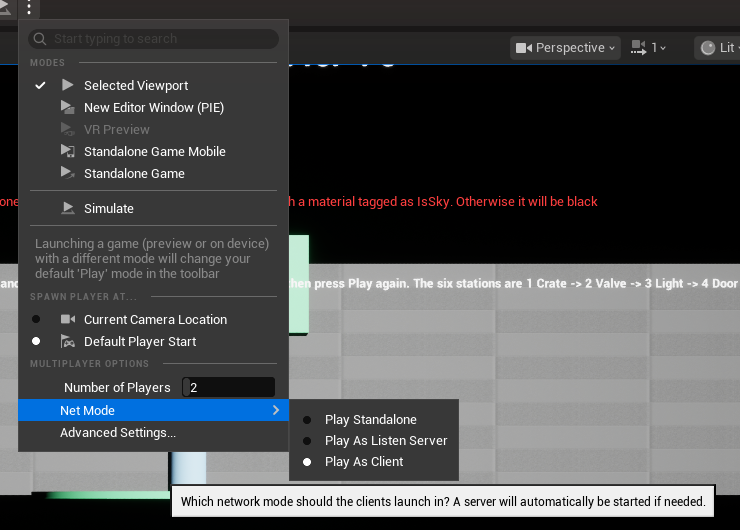
Screenshot taken on Unreal Engine 5.8.
Verify — You should now see Number of Players 2 and Net Mode Play As Client in the dropdown.
6. Play
Press Play. Two client windows open, and each prints its own 0 the moment play begins —
that is the kit handing your handler the value it already has. A third Server window may open
too. Drag the two windows apart, then walk one of them to the crate.
Verify — You should now see two client windows that both printed
0when play began, and, at the crate, the promptInteractwith anEkeycap near the bottom of the window you are playing in, and no Warning or Error from the validator in the Output Log.
7. Press
Press E in the window you are playing in, and watch both windows. If nothing happens, turn on
Enable Debug Overlay first (Project Settings → Plugins → UK Interaction → Diagnostics), then
type UK.Overlay 1 in the console — the panel shows why. Not in the Lite edition.
Verify — You should now see
Client 1: 1andClient 2: 1appear together (aServer: 1line may appear too — the server ran the same handler). Each prefix names the machine your handler ran on. If you see only oneClientline, Net Mode is not Play As Client — go back to step 5.
Next
- prompt.md — replace the prompt widget with your own.
- events.md — every event, and which machine it fires on.
- api.md — one entry per Simple node.
- behaviors.md — Hold and Toggle, and writing your own.
- demo.md — the demo map, opened with two clients.
- testing.md — running the kit's automation suite.
- install.md — engine install vs project install, one copy only.
Every Simple node
Everything above is one of these — the full Simple set the kit exposes to Blueprint.
- UKInteractorComponent::OnFocusChanged
- UKInteractorComponent::OnInteractDenied
- UKInteractorComponent::BeginInteract
- UKInteractorComponent::EndInteract
- UKInteractorComponent::GetFocus
- UKInteractorComponent::GetInteractorState
- UKInteractorComponent::GetHoldProgress
- UKInteractorComponent::OnInteractionStarted
- UKInteractorComponent::OnInteractionCompleted
- UKInteractorComponent::OnInteractionRejected
- UKInteractorComponent::OnInteractionCancelled
- UKInteractableComponent::GetUsability
- UKInteractableComponent::GetPreset
- UKInteractableComponent::GetResolvedPromptText
- UKInteractableComponent::GetResolvedPriority
- UKInteractableComponent::GetCooldownRemaining
- UKInteractableComponent::GetState
- UKInteractableComponent::OnPhaseChanged
- UKInteractableComponent::OnBehaviorValueChanged
- UKInteractableComponent::OnInteractionStarted
- UKInteractableComponent::OnInteractionCompleted
- UKInteractableComponent::OnInteractionCancelled
- UKInteractableComponent::OnInteractionRejected
- UKInteractionFunctionLibrary::GetReasonText
- UKPromptSubsystem::GetPromptState
- UKPromptSubsystem::OnPromptStateChanged